GLES2+ on AmigaOS - Colour Another Way - Vertex Attributes
Today I'm going to show you another way to draw coloured triangles with OpenGL (ES). It'll look less interesting than the previous tutorial's method. However, it's a good way to introduce using multiple vertex attributes and you'll need that for almost everything from here on out.
Per Vertex Colour
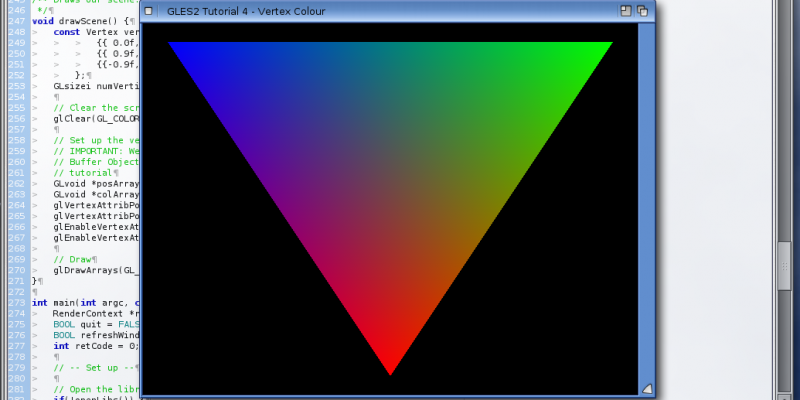
As the name suggests, vertex attributes are "attributes that describe each vertex." The vertex's position is such an attribute, but vertices can have other properties too. For example, we're about to add colours to each vertex. One will be red, another green, and the third blue. The GPU will render smooth gradients between the vertices (see the screenshot at the end of this tutorial).
Other common attributes are texture coordinates and surface normals. However, let's not get ahead of ourselves; for now it's just position and colour.
Step 1: The New Shaders
Use the hello triangle code as a starting point. Here's a direct link to download it: GLTutorial2.lha.
The Vertex Shader
Open the vertex shader (Simple2D.vert), and replace its code with the following:
#version 300 es
/** Simple 2D per-vertex colour shader.
 */

in layout(location = 0) vec2 vertPos;
in layout(location = 1) vec4 vertCol;

out vec4 colour;

void main() {
    colour = vertCol;
    gl_Position = vec4(vertPos, 0.0, 1.0);
}
This shader adds an extra input variable which is the vertex colour:
in layout(location = 1) vec4 vertCol;
You've probably noticed that both inputs have layout(location = n) qualifiers. This is a useful newish GLSL feature that allows us to fix the locations of the input variables. This saves us from having to query which attribute is what, simplifying the code. This feature is well worth using.
Layout(location = n) is only available in relatively new versions of GLSL. So, a #version is required at the top of the file, or the compiler won't accept it:
#version 300 es
NOTE: Yes, we're using GLSL for OpenGL ES 3 here, but AmigaOS 4's OpenGL ES implementation can handle it.
The Fragment Shader
No changes are needed for the fragment shader. It already outputs the interpolated colour that it receives. However, you may wish to switch to GLSL version 3.0.0 ES for consistency. Here's the code:
#version 300 es
/** Simple 2D per-fragment colour shader.
 */

#ifdef GL_ES
precision mediump float;
#endif

in vec4 colour;

out vec4 FragColour;

void main() {
    FragColour = colour;
}
Notice that GLSL 3 fragment shaders don't have a predefined gl_FragColor any more. So we define our own output variable (FragColour).
Step 2: The Vertex Attributes
With the shaders done, the next step is to set up the vertex attribute arrays. Our vertices now have two attributes which we'll put in a structure:
/** Encapsulates the data for a single vertex
 */
typedef struct Vertex_s {
	float position[2];
	float colour[4];
} Vertex;
Now the vertex data needs to be updated to include the colour (and use the Vertex structure). Here's the new code:
	const Vertex vertices[] = {
			{{ 0.0f, -0.9f}, {1.0f, 0.0f, 0.0f, 1.0f}}, // Vertex 1
			{{ 0.9f,  0.9f}, {0.0f, 1.0f, 0.0f, 1.0f}}, // Vertex 2
			{{-0.9f,  0.9f}, {0.0f, 0.0f, 1.0f, 1.0f}} // Vertex 3
		};
	GLsizei numVertices = sizeof(vertices) / sizeof(Vertex);
This should replace the original vertex array at the top of the drawScene() function. One subtle change is how numVertices is calculated. We're using a vertex structure now, so the array's total size is divided by sizeof(Vertex).
Step 3: Using the New Vertex Attribute
The final step is to enable and bind the colour array. Here's the updated code (also in drawScene()):
	// Set up the vertex array
	// IMPORTANT: We're using vertex arrays for simplicity. You should use Vertex
	// Buffer Objects (VBOs) for performance. We'll cover those in another
	// tutorial
	GLvoid *posArray = (GLvoid*)vertices;
	GLvoid *colArray = (GLvoid*) ((char*)vertices + offsetof(Vertex, colour[0]));
	glVertexAttribPointer(0, 2, GL_FLOAT, GL_FALSE, sizeof(Vertex), posArray);
	glVertexAttribPointer(1, 4, GL_FLOAT, GL_FALSE, sizeof(Vertex), colArray);
	glEnableVertexAttribArray(0);
	glEnableVertexAttribArray(1);
PosArray and colArray contain pointers to the individual vertex attribute arrays. The position and colour data are stored together one vertex at a time in the Vertex structure, so each vertex's data is stored sizeof(Vertex) bytes apart. So we pass this value to glVertexAttribPointer() as the stride for both attributes. This is known as interleaved arrays.
With these changes done, the program now renders a coloured triangle (see below).

Conclusion
This tutorial has shown how to use multiple vertex attributes to add colour. Each vertex has its own colour and the GPU generates a smooth gradient between them via interpolation.
Sure, the result is rather boring. Make sure you understand how to use multiple vertex attributes, though, because you'll be using it a lot in future. Next time we'll finally make the leap to 3D!
Download the full tutorial code: GLTutorial4.lha


Post your comment